In this article you will learn how to configure your Invoice Template. This template will allow you to customize your invoices to fit your logo colors, information you would like to have on your invoice, custom messages and more.

Below is a video of how to configure your Invoice Template:
Below are step by step instructions on how to configure your Invoice Template:
1 - Click on the Admin tab

2 - Scroll to the Global Settings section and click on the Ticket Templates bubble

3 - Click on the Invoice Template link

4 - Next you will see the Editing Invoice Template page

5 - You will first need to choose the address that you want to appear. You will have 3 options:
1 - Use Restaurant Address: This is the address that the order was taken under (multiple locations)
2 - Use Account Address: This is the address that is found under the Account Address in the Main Admin page
3 - Use Custom Address: This will be an address and phone number that you enter in yourself (i.e. a
By default #2 option will be selected

6 - Here is where you can find the addresses:
1 - Admin tab - Restaurant Location section - Location bubble - Current Contact Information for this location section
2 - Admin tab - Account/User Settings bubble - Edit Admin Account Details link
7 - If you want to customize your from address (for example a PO Box number) then you will need add that here: Use this address as the return address for all new invoices:

8 - Invoice Terms Settings tab: This tab will allow you to chose the terms you want to appear on your invoice. Click on the Manage Terms tab. To learn more about the invoice template you can look at the article with more information on that.

9 - Any existing Terms that you have already created will appear below. If you need to add a new term click the Add New Terms tab.


10 - Once you click the New Terms tab you will add the name of the Term and then click Save This Information. The term will then appear in your list of terms.

Below we will discuss each section that appear by default:
11 - Logo: This box names can not be changed. Logo will not appear on your invoice. To add your logo you will click inside the box where it says: Drop images or click here. Then you can choose from your computer which logo you would like to upload.

12 - Company Info: By default your company's information will appear here.
If you would like additional information hover your mouse on the top left corner of the box with Company Info listed. You will then see a + sign. Click on the plus sign and you will see a line for Custom and Company.


If you want to add a custom message click the Custom Text Line link

If you want to add additional pre-populated information about your company click on the Company link. Company Phone number and Company Email will appear.

13 - Custom Message: This will be the name of the document. By default Invoice will appear in the text color Black. You can customize the name of the document, font color and location of the name.

To customize the name take your mouse to the Invoice line and click on the Pencil icon. Once you click on the pencil icon a box will appear with the name invoice. You can then edit the name.


If you want to change the font color of the name click on the #00000. A color wheel chart will appear and you can change the font color.

You can have the document name appear in to the Left of the box (by default), Center or Right of the box. To make this change place your mouse over the name Invoice. Then click on the 3 vertical lines. From there the name will adjust.

14 - Bill To: This box will include all the customer's information. You have the option to add more information, edit the name of the information or delete out information.

To add more information hover your mouse on the top left corner of the box with Bill To name listed. You will then see a + sign. Click on the plus sign and you will see a line for Custom, Customer, and Invoice. To see the additional pre-populate information for Customer and Invoice take your mouse to the line and any additional information will appear to the right. To add Custom information that will not pre-populate click the Custom line.

If you want to edit the default information that already appears you can put your mouse over the line you want to edit and click on the Pencil icon. Click on the Pencil icon and a box will appear with the name of the information. You can then edit and ok to save the new information.


If you want to Delete a default information that already appears you can put your mouse over the line you want to delete and click on the Trash Can icon. Click on the Trash Can icon and the information will be deleted.

15 - Deliver To: This box will include all the delivery's information. You have the option to add more information, edit the name of the information or delete out information.

To add more information hover your mouse on the top left corner of the box with Delivery To name listed. You will then see a + sign. Click on the plus sign and you will see a line for Custom, Invoice, Delivery. To see the additional pre-populate information for Invoice and Delivery take your mouse to the line and any additional information will appear to the right. To add Custom information that will not pre-populate click the Custom line.

If you want to Edit the default information that already appears you can put your mouse over the line you want to edit and click on the Pencil icon. Click on the Pencil icon and a box will appear with the name of the information. You can then edit and save the new information.

If you want to Delete a default information that already appears you can put your mouse over the line you want to delete and click on the Trash Can icon. Click on the Trash Can icon and the information will be deleted.

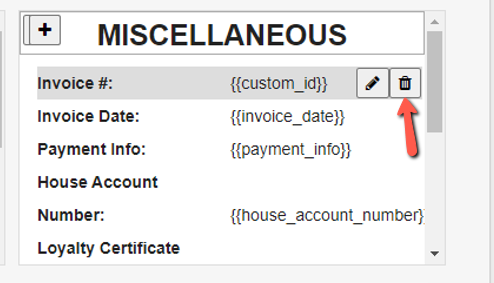
16 - Miscellaneous: This box will include all the miscellaneous information. You have the option to add more information about the invoice, edit the name of the information or delete out information.

To add more information hover your mouse on the top left corner of the box with Miscellaneous name listed. You will then see a + sign. Click on the plus sign and you will see a line for Invoice. To see the additional pre-populate information for Invoice take your mouse to the line and any additional information will appear to the right.

If you want to Edit the default information that already appears you can put your mouse over the line you want to edit and click on the Pencil icon. Click on the Pencil icon and a box will appear with the name of the information. You can then edit and save the new information.

If you want to Delete a default information that already appears you can put your mouse over the line you want to delete and click on the Trash Can icon. Click on the Trash Can icon and the information will be deleted.
17 - Custom Message 1: This will be were you list any additional information you want the customer to see on their invoice. By default the message will say: Please Pay From This Invoice.

This message will appear in Black.
To customize the message take your mouse to the Please Pay From This Invoice line and click on the Pencil icon. Once you click on the Pencil icon a box will appear with the message. You can then Edit the message.

If you want to change the font color of the name click on the #00000. A color wheel chart will appear and you can change the font color.

You can have the message appear in to the Left of the box (by default), Center or Right of the box. To make this change place your mouse over the name Invoice. Then click on the 3 vertical lines. From there the name will adjust.

18 - Item Section: This is the section that will list all of the menu items that were ordered by the customer.

Location Catered Text: this line can be customized

Item Font Color: If you can change the font color of the bar that shows Item - Unit Price - Quantity - Total Price you can do that here. Click on the #4f90bb A color wheel chart will appear and you can change the font color.

Item Background Color: If you can change the background font color of the bar that shows Item - Unit Price - Quantity - Total Price you can do that here. Click on the #dce9f1 A color wheel chart will appear and you can change the font color.

Menu Item Information: By default the menu item name will appear. You have the option have the Description, Special Instructions, and Modifiers to appear under the menu items name.
Description: This is the description of the menu item that you have given when creating your menu.
Special Instructions: This is additional information that you have added to menu item for this particular invoice.
Modifiers: Options, Toppings Extras
To add one of the features to the invoice you will need to check off the box next to the feature.
If you want to reorder the features click and drag the 9 dot square.

19 - Paid Section: If the invoice has been paid for then the PAID stamp will appear here. You can change the color of the PAID stamp.

If you want to change the font color of the name click on the #00c000. A color wheel chart will appear and you can change the font color.

20 - Custom Message 2: This last section is for you to type any additional message you want the customer to see at the bottom of their invoice. We have also included a Location Specific Information check box. This box would be checked off if you have a specific location you want the payments to mailed too. For example: We appreciate your business and we hope you enjoy your catering. Please mail checks to: PO Box 123 Such Street, Nashville TN, 37922

If you want to use the Include Location Specific Information you will need to:
1 - Make sure the check box is checked off
2 - Click on the Edit Location Info tab
3 - Fill in the new mailing address
4 - Click Save Location tab


We also recommend that you add information in the Custom Message box.

If you want to change the font color of the name click on the #00c000. A color wheel chart will appear and you can change the font color.

21 - Be sure to click Save once you are done with all your changes. Note you can also Preview what the invoice will look like by clicking the Preview tab

You have now learned how to customize your Invoice Template.